
30-Minute Quick Chicken Brine Recipe
For busy home chefs, a 30-minute chicken brine is revolutionary. Soaking chicken in a salt solution with herbs and spices for 30 minutes before cooking is simple. Unlike conventional brines, which require hours or overnight soaking, our fast technique still provides juicier, more flavorful chicken without the lengthy wait.
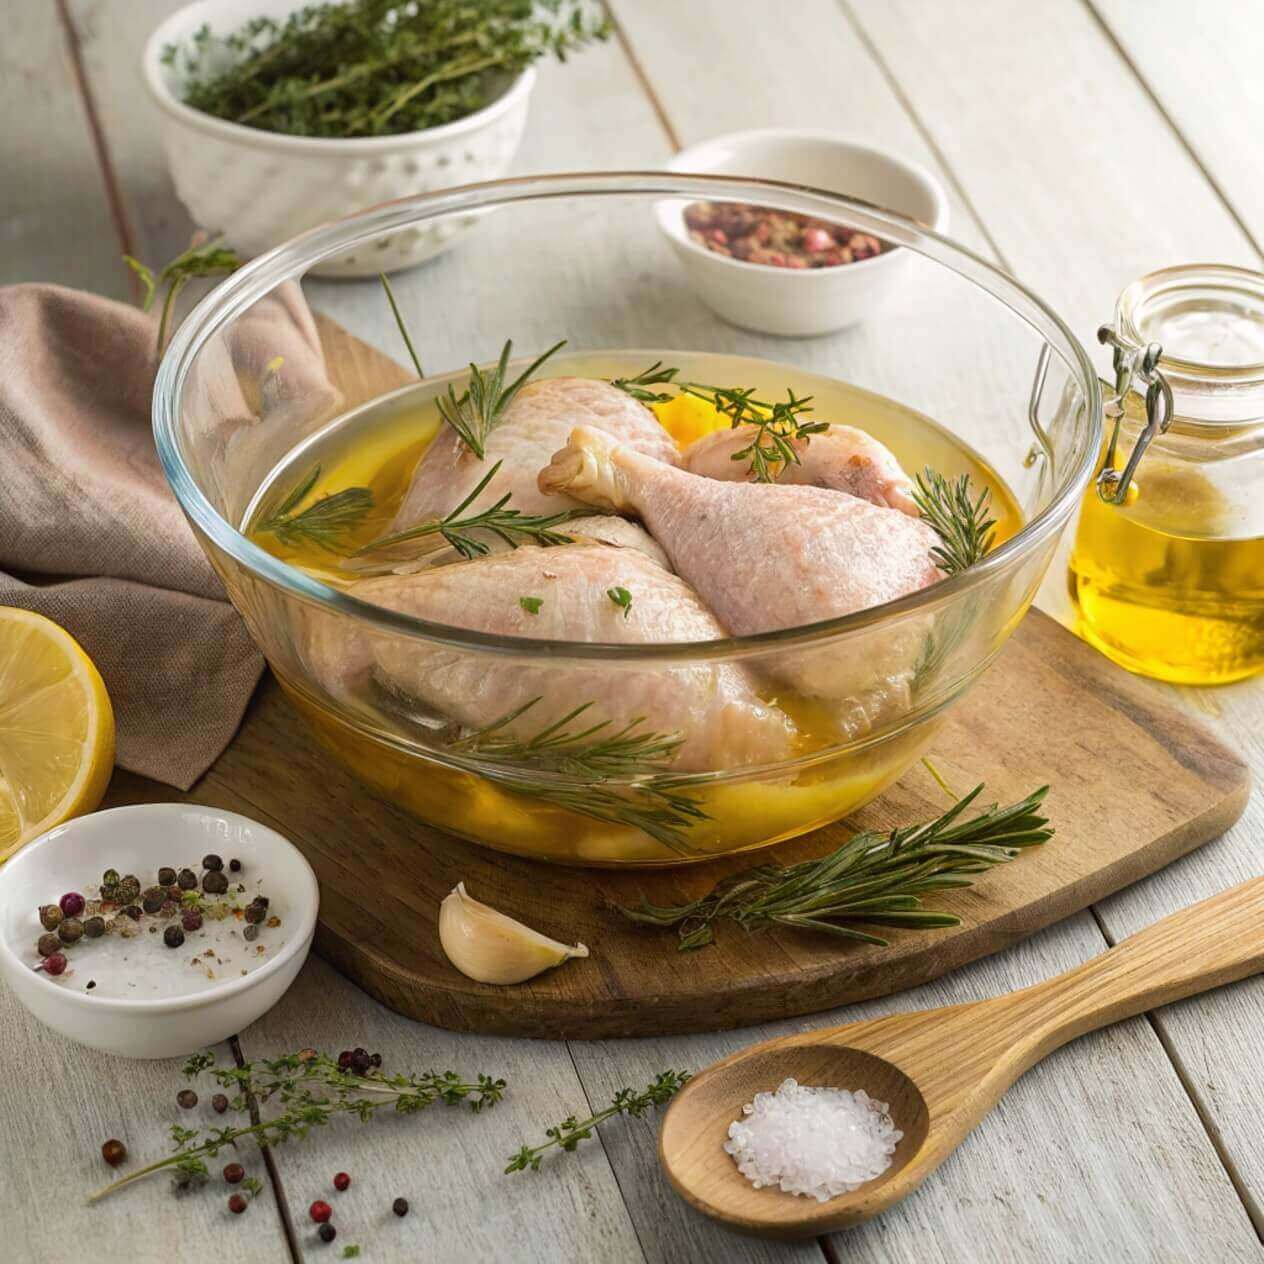
The basic fast brine requires four components: water, salt, sugar, and your selected spices. For each quart (4 cups) of water, add ¼ cup of salt and two teaspoons of sugar. Add peppercorns, bay leaves, garlic cloves, or any other preferred spices. This ratio benefits a 30-minute soak as it allows the chicken to absorb moisture and taste without being overly salty.
Many home chefs forego brining because they believe it is too time-consuming. This 30-minute approach, however, is relatively straightforward to incorporate into your meal preparation period. While the chicken is brining, you may prepare other components of your dinner, such as the fragrant pulao rice we will discuss later in this post.
Quick Chicken Brine Ingredients
For a simple 30-minute chicken brine that works with 1-2 pounds of chicken parts, you’ll need:
- 4 cups cold water
- ¼ cup kosher salt (use just three tablespoons if using table salt)
- 2 tablespoons sugar (white or brown)
- 2-3 garlic cloves, crushed
- 1 tablespoon black peppercorns
- Optional additions: bay leaves, lemon slices, herbs like thyme or rosemary
This easy brine works for any cut of chicken—breasts, thighs, drumsticks, or wings. The 30-minute schedule is great for bone-in pieces. For boneless chicken breasts, you may even go as short as 15-20 minutes to avoid them from getting too salty.
Why Brining Makes Chicken Better
Bringing chicken before cooking eliminates numerous frequent concerns that home chefs experience. First, it helps the chicken remain moist throughout cooking. The salt in the brine allows the meat to retain its natural moisture, so it won’t dry out as much if you cook it too long.
The science underlying bringing is easy. When you put chicken in a salt solution, the salt breaks down part of the muscle proteins. This forms microscopic gaps that fill with the brine solution. During cooking, these pockets of moisture keep the meat juicy. The salt also helps the chicken retain its natural moisture throughout cooking.
Another essential advantage is taste. The salt and spices in the brine don’t simply linger on the surface; they penetrate the meat. This means every mouthful has more taste, not just the exterior. With the short 30-minute approach, the flavors won’t penetrate as deeply as with lengthier brines, but you’ll still notice a considerable difference compared to unbrined chicken.
Brining also allows for greater room for mistakes while cooking. Chicken, particularly breast meat, may go from exquisite to dry in only a minute or two of overcooking. Brined chicken has more moisture, so it’s more forgiving if you leave it on the stove too long.
Many restaurants employ brining for their chicken dishes, although they typically brine for hours or overnight. The 30-minute approach delivers many of these advantages to home cooking without the lengthy wait.
Complete Guide to 30-Minute Chicken Brine
Step-by-Step Brining Process
The brining procedure is straightforward but requires attention to detail for optimal results. Combine the brine solution in a non-reactive container like glass or food-grade plastic. Avoid using aluminum or copper containers, which may react with the salt.
Begin with cold water, then add salt and sugar, stirring until thoroughly dissolved. Add your choice of aromatics and spices. Smashed garlic cloves, crushed peppercorns, bay leaves, and lemon slices all work nicely. For an Asian-inspired taste, consider adding sliced ginger and star anise.
Once your brine is combined, fully immerse the chicken pieces. If the chicken floats, set a small plate on top to keep it immersed. Then, chill the jar for 30 minutes. Please don’t keep it at room temperature, which may stimulate bacterial growth.
After 30 minutes, remove the chicken from the brine and rinse it thoroughly under cold running water. This eliminates extra salt from the surface. Pat the chicken dry with paper towels before cooking. This step is crucial for achieving a nice browning on the chicken.
Brine Variations for Different Flavors
- While the basic salt-sugar brine works for most dishes, you may alter it for other cuisines:
- For Mediterranean flavors, add lemon zest, rosemary, thyme, and a dash of olive oil to the brine.
- For Mexican-inspired chicken, Add lime juice, cilantro stems, cumin, and a sliced jalapeño to the brine.
- For Asian flavor profiles: Mix with soy sauce (cutting the salt proportionally), ginger, garlic, and a sprinkle of five-spice powder.
- For Southern-style chicken, add a couple of teaspoons of spicy sauce, paprika, and cayenne to your brine.
Cooking Brined Chicken
Brined chicken cooks the same manner as conventional chicken, but there are a few things to remember. First, brined chicken will brown quickly because of the sugar in the brine. Oversee it while grilling or pan-frying to avoid burning.
Second, brined chicken already has salt embedded throughout, so you’ll want to decrease or remove salt in any spice rub or sauce. Taste as you go to prevent over-salting the final meal.
The finest cooking techniques for brined chicken include:
- Grilling: The extra moisture helps avoid drying out over high heat
- Roasting: Results in juicier meat, particularly for chicken breasts
- Pan-searing: Creates a gorgeous crust while keeping juiciness within
- Baking: Even oven-baked chicken remains juicy with pre-brining
For chicken coated in breading or batter, ensure it’s entirely dry after brining, as this allows the coating to adhere correctly.
Detailed Pulao Recipe Guide
Pulao (sometimes called pilaf) is a fragrant rice dish cooked with spices and occasionally meat or vegetables. It’s the ideal complement for your brined chicken, producing a full and fulfilling supper. Unlike birBiryanihich, which is more intricate and layered, pulao is a simpler one-pot meal that’s eaBiryani master.
Basic Pulao Ingredients
For a typical pulao that feeds 4-6 people, you’ll need:
- 2 cups basmati rice
- 4 cups water or broth
- 2 tablespoons ghee or oil
- 1 big onion, thinly sliced
- 2-3 cloves of garlic, minced
- 1-inch piece of ginger, grated
- 2 bay leaves
- 4 green cardamom pods
- 1 cinnamon stick
- 4 cloves
- 1 teaspoon cumin seeds
- Salt to taste
- 1/4 cup chopped fresh cilantro or mint for garnish
Pulao Preparation Method
Start by washing the rice well until the water runs clear. Then, soak it for 30 minutes while you prepare the remaining ingredients. Soaking helps the grains cook evenly and become fluffy.
Heat ghee or oil in a heavy-bottomed saucepan with a tight-fitting cover. Add the entire mixture of spices (cardamom, cinnamon, cloves, and bay leaves) and cumin seeds. Let them sizzle for 30 seconds until aromatic.
Add the sliced onions and sauté until they become golden brown, approximately 7-10 minutes. This caramelization gives the pulao a delicious richness. Add the minced garlic and grated ginger, and simmer for another minute until their raw fragrance has vanished.
Drain the soaking rice and add it to the saucepan. Gently swirl to coat the rice with the spicy ghee for approximately 2 minutes. This step toasts the rice slightly and adds flavor.
Add water or broth and salt. For most pulao recipes, employ a ratio of 1:2 (rice to liquid). Bring to a boil, decrease the heat to the lowest setting, cover securely, and simmer for 15 minutes without lifting the lid.
After 15 minutes, turn off the heat, but keep the pot covered for another 10 minutes. This resting interval enables the rice to continue cooking in its own steam.
Finally, fluff the rice lightly with a fork and sprinkle with fresh herbs before serving.
Best Cooking Methods for Brined Chicken to Serve with Pulao
Pan-Seared Chicken: After brining, pat the chicken dry. Season sparingly with pepper (remember it already has salt from the brine). Sears in a hot pan with oil until golden brown on both sides and cooked through. The high heat generates a delicious crust, while the brine keeps the interior wet.
Grilled Chicken: Brining chicken enhances its flavor for grilling. The sugar in the brine helps produce attractive grill markings and caramelization, while the salt ensures the chicken remains moist even with high heat.
Oven-Roasted Chicken: Place brined chicken pieces on a rack over a baking sheet. Roast at 425°F (220°C) until the exterior is crispy and the interior temperature reaches 165°F (74°C). The raised cooking enables heat to flow around the bird.
Serving Suggestions
When serving brined chicken with pulao, consider these additions:
- A fresh cucumber raita (yogurt sauce)
- Tangy pickled onions
- A simple green salad with lemon dressing
- Roasted veggies seasoned with the same spices as the pulao
What makes a 30-minute brine helpful for chicken?
A fast brine works because it utilizes a greater salt concentration in less time. While lengthier brines utilize roughly 5-8% salt solution, a 30-minute brine uses closer to 10%. The salt immediately penetrates the chicken’s outer layers, enhancing its taste and moisture retention.
This approach works well for smaller parts, such as chicken breasts, thighs, or wings. Larger portions, such as entire chickens, benefit more from longer brining durations. The rapid brine still considerably enhances juiciness compared to unbrined chicken.
Can I reuse chicken brine?
No, never reuse chicken brine. Once raw chicken has been in the solution, the brine contains germs and must be destroyed after usage. Making new brine each time promotes food safety.
How can I prevent pulao rice from becoming sticky?
Sticky pulao occurs for numerous causes. First, ensure you’re using aged basmati rice with less surface starch. Always wash the rice thoroughly until the water runs clear, then soak it for 20-30 minutes before cooking.
The appropriate water-to-rice ratio is also essential—generally, two cups of water to one cup of rice works nicely for pulao. Avoid stirring rice as it cooks, as this releases starch and promotes stickiness. Finally, after cooking, let the rice rest, covered, for 10 minutes, then fluff it using a fork instead of a spoon.
What’s the difference between pulao and birBiryani
Although both are spicy rice recipes, they differ in their cooking processes aBiryanilexity. Pulao cooks all ingredients in one pot, including spices, veggies, and occasionally meat, all cooked with rice. The taste is more uniform, and the preparation is easier.
Biryani, on the other hand, often involves partially cooking rice and meat separately, then combining them with additional spices and slow cooking until they are thoroughly cooked. Typically, BirBiryani is regarded as a sophisticated spice, especially for a festive or special occasion.
The combination of quick-brined chicken and handmade pulao embodies the perfect blend of convenience and deliciousness. The 30-minute brine turns regular chicken into something exceptional without needing hours of preparation. Similarly, pulao offers diverse tastes within a basic one-pot cooking technique.
These approaches demonstrate how learning fundamental culinary concepts can significantly enhance everyday cooking. The brining technique enriches the protein, while the meticulous layering of spices and the perfect preparation of rice elevate a plain grain to a fragrant, fulfilling meal.
Learning these two techniques adds varied abilities to your culinary arsenal. The methods may be modified to suit diverse tastes, nutritional needs, and events. Whether for a midweek family dinner or weekend entertaining, this mix of juicy brined chicken with fragrant pulao creates a dish that’s both accessible to cook and outstanding to present.